How to Draw a Cute Cat Face Easily: A Step-by-Step Guide

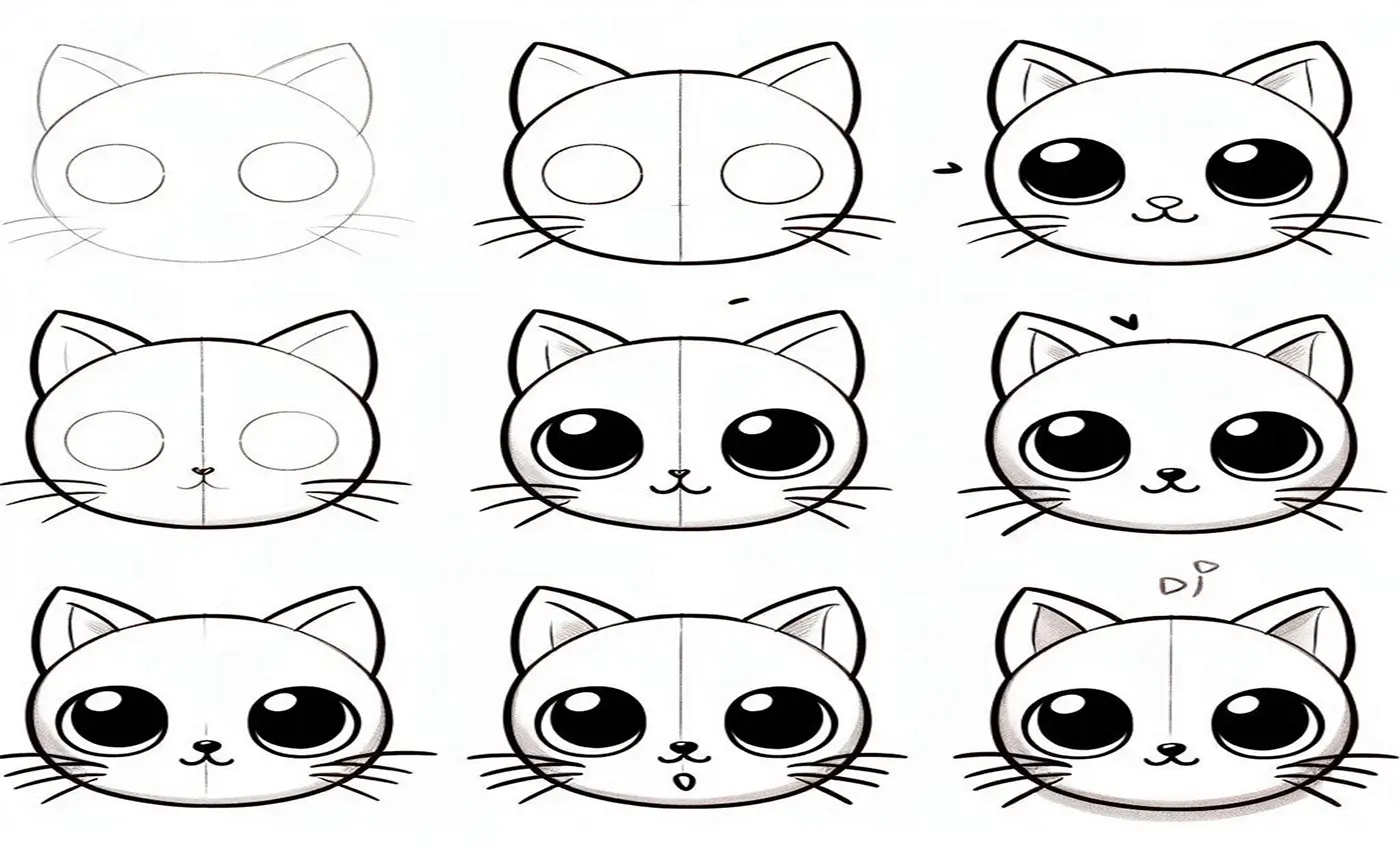
Drawing a cute cat face can be a fun and rewarding experience, whether you’re an aspiring artist or just looking for a relaxing activity. This step-by-step guide will walk you through the process of creating an adorable cat face drawing that is sure to impress. Follow these simple instructions, and you’ll be able to draw a charming cat face with ease.
Materials You’ll Need to Draw a Cute Cat Face
- Paper
- Pencil
- Eraser
- Black pen or marker
- Coloring materials (optional)
Step 1: Draw the Head and Ears
Start by drawing a large circle for the cat’s head. This will act as the foundation for your remaining drawing. Next, add two triangles on top of the circle for the ears. Make sure the triangles are slightly rounded at the top to give the ears a cute and friendly appearance.
Step 2: Add the Eyes
Inside the circle, draw two large circles for the eyes. Place them evenly spaced on either side of the centerline. These big, expressive eyes are what will give your cat its adorable look. Within each eye, draw a smaller circle near the top to represent the light reflection. This will make the eyes appear shiny and full of life.
Step 3: Draw the Nose and Mouth
Just below the cat eyes, draw a small upside-down triangle for the nose. From the bottom of the nose, draw two curved lines that extend downward and outward to form the mouth. You can add a slight upward curve at the ends of these lines to create a happy, smiling expression.
Step 4: Add Whiskers and Details
Draw three short lines on each side of the face, starting from the nose area, to represent the whiskers. You can also add small curved lines inside the ears to give them more detail. At this stage, your cat face should already be looking quite cute!
Step 5: Refine the Shapes
Go over your initial sketch, refining the shapes and adding more details as needed. You might want to make the eyes even bigger or adjust the shape of the ears to make them more symmetrical. This is your chance to make any final adjustments before inking your drawing.
Step 6: Ink Your Drawing
Once you’re satisfied with your pencil sketch, use a black pen or marker to ink your drawing. Carefully trace over the lines, making sure to add any additional details like fur texture or extra whiskers. Allow the ink to dry completely before erasing any remaining pencil marks.
Step 7: Add Color
Now it’s time to bring your cute cat face to life with some color! Use colored pencils, markers, or crayons to add color to your drawing. You can choose traditional cat colors like orange, gray, or black, or get creative with fun and vibrant colors. Don’t forget to color in the eyes, leaving the small reflection circles white to keep them looking shiny.
Tips to Draw a Cute Cat Face
- Keep It Simple: Stick to basic shapes and simple lines to maintain a cute and approachable look.
- Big Eyes: Drawing large, expressive eyes will make your cat face more adorable and engaging.
- Soft Lines: Use curved lines instead of sharp angles to give your drawing a softer, friendlier appearance.
- Practice: Don’t be discouraged if your first few attempts aren’t perfect. Keep practicing, and you’ll improve over time.
Conclusion
Drawing a cute cat face can be a delightful and relaxing activity, and with this step-by-step guide, it’s easier than ever. By following these simple instructions, you can create an adorable cat face drawing that you can be proud of. Whether you’re a beginner or an experienced artist, this guide will help you achieve a charming and cute result. So grab your drawing materials and start creating your cute cat face masterpiece today!
Post Comment